In the fast-paced world of design, prototyping plays a crucial role in bringing ideas to life and ensuring that designs meet user needs before moving into development. Figma has emerged as a powerful tool for prototyping, offering a collaborative platform where designers can create interactive prototypes seamlessly. In this extensive guide, we will explore how to prototype in Figma in detail, covering everything from the basics to advanced techniques. Whether you are a beginner or an experienced designer, this guide will help you leverage Figma’s prototyping capabilities to enhance your design workflow.
What is Prototyping?
Prototyping is the process of creating a preliminary version of a product to test and validate design concepts. In the context of UI/UX design, a prototype is an interactive model of a website or application that simulates user interactions. Prototypes help designers and stakeholders visualize the end product, identify usability issues, and gather feedback before moving forward with development.
Why Use Figma for Prototyping?
Figma stands out as a top choice for prototyping due to its user-friendly interface and robust features. Here are some reasons why Figma is a preferred tool for prototyping:
- Collaboration: Figma allows multiple users to work on the same file simultaneously, making it ideal for team projects. Real-time collaboration ensures that everyone is on the same page and facilitates faster feedback and iteration.
- Cloud-Based: As a cloud-based tool, Figma provides easy access to your projects from any device with an internet connection. This eliminates the need for file transfers and ensures that the latest version of your prototype is always available.
- Interactive Components: Figma offers advanced interactive components and prototyping features, allowing designers to create complex interactions and animations. This capability enhances the realism of prototypes and provides a better understanding of user flows.
- Integration: Figma integrates with various tools and plugins, enabling designers to streamline their workflow and incorporate additional functionalities as needed.
Getting Started with Prototyping in Figma
To get started with prototyping in Figma, follow these steps:
1. Create a New File or Open an Existing Design
Begin by creating a new file in Figma or opening an existing design file that you want to prototype. Ensure that your design is well-organized with clear layers and components.
2. Design Your Screens
Before diving into prototyping, ensure that you have all the necessary screens designed. This includes all the key pages and interactions you want to showcase in your prototype. Use Figma’s design tools to create your layouts, add UI elements, and ensure consistency across screens.
3. Add Interactive Elements
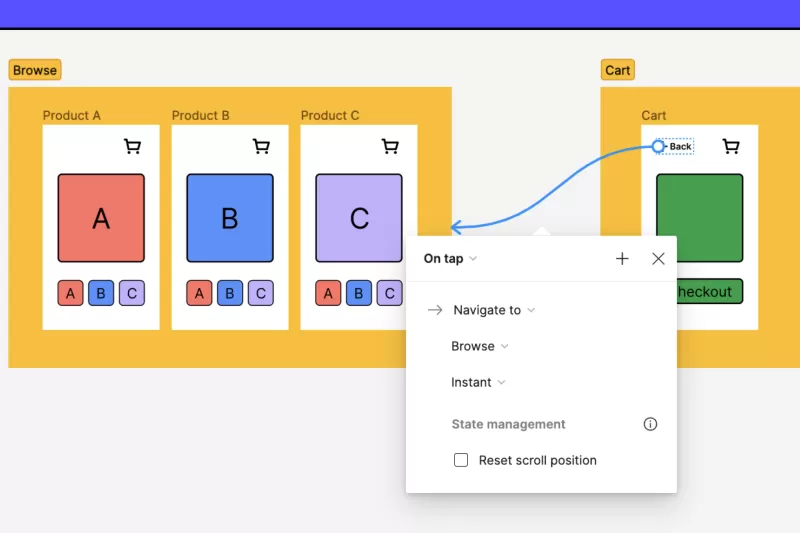
To create an interactive prototype, you need to define the interactions between different screens. Figma’s prototyping features allow you to set up links, transitions, and animations. Follow these steps to add interactive elements:
- Select the Frame: Click on the frame or element you want to make interactive. This could be a button, a link, or any other clickable element.
- Create a Link: With the element selected, go to the Prototype tab in the right-hand panel. Click on the plus icon ( ) next to the "Interactions" section to create a new interaction.
- Define the Action: Choose the type of interaction you want to create. Common actions include "On Click," "On Hover," and "On Drag." For example, you might choose "On Click" to navigate to another screen when a button is pressed.
- Select the Destination: After defining the action, select the destination frame or screen that the interaction should lead to. You can also specify animation types and durations to control how the transition between screens will appear.
4. Set Up Navigation Flows
Designing a prototype involves setting up navigation flows to simulate user journeys. Figma allows you to create multiple links and interactions between screens, enabling you to map out various user paths. Use Figma’s interactive components to set up these flows:
- Add Overlays: Use overlays to display additional information or modals on top of your current screen. This is useful for creating pop-ups, tooltips, or sidebars.
- Create Interactions for Components: Define interactions for reusable components, such as buttons or navigation bars, to maintain consistency across your prototype.
5. Preview and Test Your Prototype
Once you’ve set up your interactions and navigation flows, it’s time to preview and test your prototype. Figma provides a preview mode where you can interact with your design as if it were a live application. To access the preview mode:
- Click the Play Button: In the top-right corner of the Figma interface, click the "Play" button to enter presentation mode. This will display your prototype in a separate window where you can interact with it and test different user flows.
- Test Interactions: Navigate through your prototype and test all interactions to ensure that they work as expected. Check for any usability issues or inconsistencies and make necessary adjustments.
6. Share and Gather Feedback
Sharing your prototype with stakeholders and gathering feedback is a crucial step in the design process. Figma makes it easy to share prototypes with others and collect valuable input:
- Generate a Share Link: Click on the "Share" button in the top-right corner of the Figma interface to generate a shareable link. You can customize the link’s permissions to control who can view or edit the prototype.
- Invite Collaborators: If you’re working with a team, you can invite collaborators directly to your Figma file. This allows them to view, comment, and provide feedback in real time.
- Collect Feedback: Use Figma’s commenting feature to gather feedback from stakeholders. Users can leave comments directly on the prototype, making it easy to address specific issues and iterate on your design.
7. Refine and Iterate
Based on the feedback you receive, make necessary refinements to your prototype. Figma’s real-time collaboration features enable you to make changes and update your prototype quickly. Iteration is key to creating a successful design, so be prepared to revisit and adjust your prototype as needed.
Advanced Prototyping Techniques in Figma
For more complex prototypes, Figma offers several advanced techniques and features:
- Use Smart Animate: Smart Animate allows you to create smooth transitions between frames by automatically animating changes in properties such as position, size, and opacity. This feature enhances the realism of your prototype and provides a more engaging user experience.
- Create Component Variants: Use Figma’s component variants to manage different states of a component, such as buttons with different colors or states (e.g., active, disabled). This helps streamline your design process and maintain consistency across your prototype.
- Utilize Prototyping Plugins: Figma’s extensive plugin library includes tools for enhancing prototyping capabilities. Explore plugins that offer additional features such as advanced animations, user testing, and analytics.
Conclusion
How to prototype in Figma involves a systematic approach to designing interactive and engaging prototypes. By leveraging Figma’s powerful prototyping features, you can create realistic simulations of your designs, gather valuable feedback, and refine your ideas before moving into development. Whether you’re working on a simple app or a complex web application, Figma’s collaborative and versatile platform provides the tools you need to bring your designs to life.
If you’re looking for a partner to help with your web design needs and bring your digital vision to reality, Sympaweb is the ideal choice. With a team of skilled designers and developers, Sympaweb offers top-notch web design services that can help you create exceptional user experiences and achieve your business goals.